

Lightning Component To Display Contacts Related To Particular Account | Salesforce Lightning

Salesforce Lightning Component to Display Contacts Related to particular Account
Prerequisites :
- My Domain Must be enabled and deployed.
Step 1 : Create Apex Class for fetching Contact Details :
Use notation “@AuraEnabled” so that it is available in our component.
--------------------------------------------------Apex Class------------------------------------------------------
public with sharing class AjinkyaTestLightningAccController
{
@AuraEnabled
public static list<Contact> getRelatedList(Id recordId)
{
List<Contact> Conlist = [Select id, name,firstname,lastname from Contact where AccountId=: recordId ];
return Conlist;
}
}
--------------------------------------------------Apex Class------------------------------------------------------
Step 2 : Create a New lightning Component :
- Create attributes of ID and Contact List so that we can fetch the records from the controller to Component.
--------------------------------------------------Cmp------------------------------------------------------
<aura:component controller = "AjinkyaTestLightningAccController" implements="flexipage:availableForRecordHome,force:hasRecordId" access="global" >
<aura:attribute name="recordId" type="Id" />
<aura:attribute name="ContactList" type="Contact[]" />
</aura:component>
--------------------------------------------------Cmp-------------------------------------------------------
Step 3 : Create Controller (JS) for this Component :
- In Our example, we have created a variable ConList where we are calling the method “getRelatedList(Id recordId)” which we have created in our class earlier in 1st step.
- In Lightning component, the syntax for calling method is “c.methodname” in our case it will be “c.getRelatedList”.
- Now We have to pass the parameter of ID (Account ID) so that it will query our data. Using the same variable Conlist we will add a parameter to the method. “.setParams()” is the method for setting parameter. In our example it will be “Conlist.setParams()”.
- After setting parameter we have to set data in component attributes we created earlier in Step 2. “.setCallback()” method will return our data from query and using component.set(“v.attributename” , data.getReturnValue()) we will set the values in the component. In our example it will be - component.set(“v.ContactList” , data.getReturnValue()).
--------------------------------------------------JS------------------------------------------------------
({
myAction : function(component, event, helper)
{
var ConList = component.get("c.getRelatedList");
ConList.setParams
({
recordId: component.get("v.recordId")
});
ConList.setCallback(this, function(data)
{
component.set("v.ContactList", data.getReturnValue());
});
$A.enqueueAction(ConList);
}
})
--------------------------------------------------JS------------------------------------------------------
Step 4 : Change component code to display the data :
--------------------------------------------------Cmp-------------------------------------------------------
<aura:component controller = "AjinkyaTestLightningAccController" implements="flexipage:availableForRecordHome,force:hasRecordId" access="global" >
<aura:attribute name="recordId" type="Id" />
<aura:attribute name="ContactList" type="Contact[]" />
<aura:handler name="init" value="{!this}" action="{!c.myAction}" />
<aura:iteration items="{!v.ContactList}" var="con">
Contact Name = {!con.Name} <br/>
</aura:iteration>
</aura:component>
--------------------------------------------------Cmp-------------------------------------------------------
Step 5 : Add the component to Our Lightning Page.
- Open any account which has related contacts.
- Click on Setup button Edit Page.

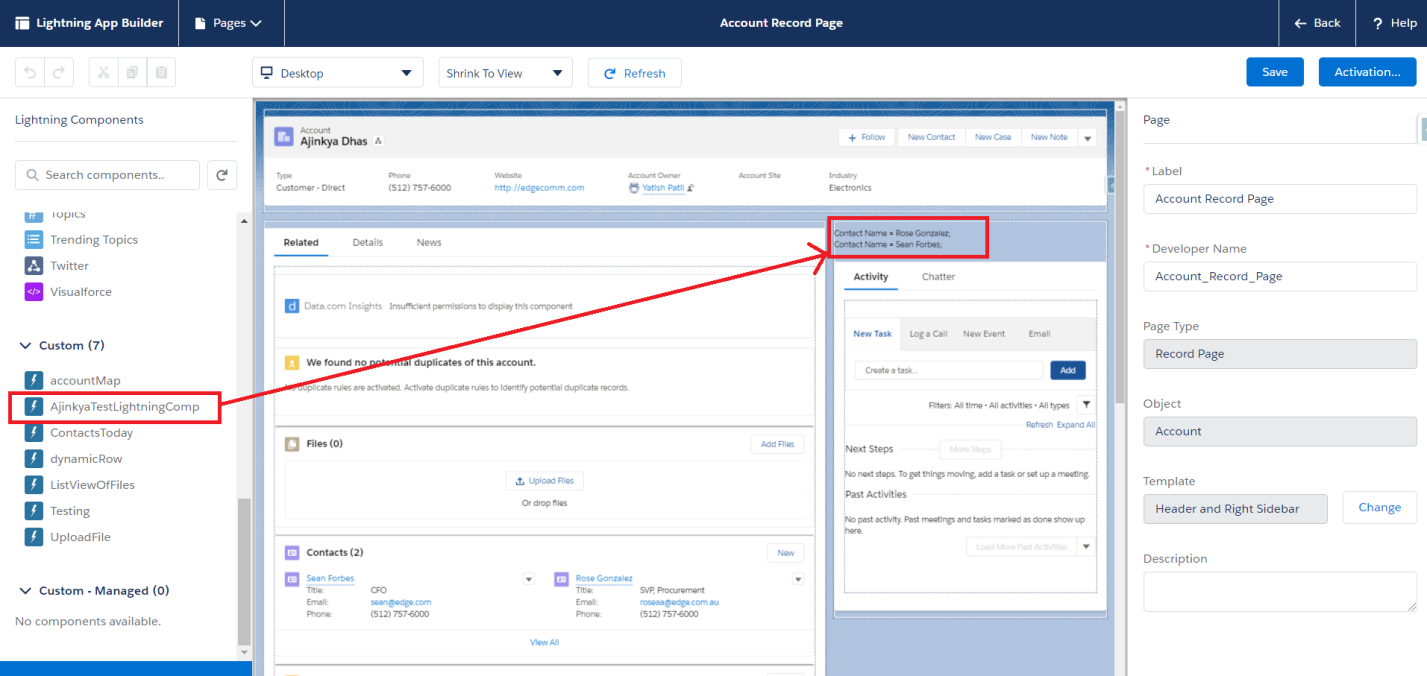
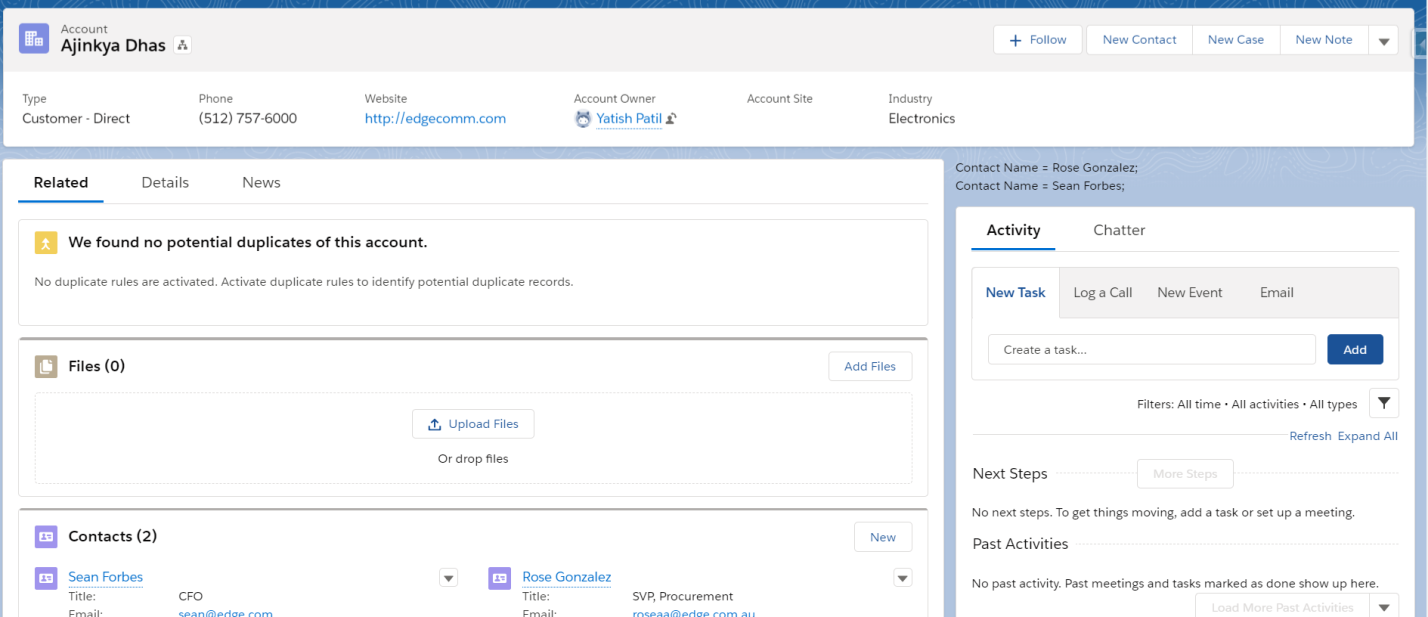
Now Go Back to an Account Detail page with contacts in it. You can see the component we just added.
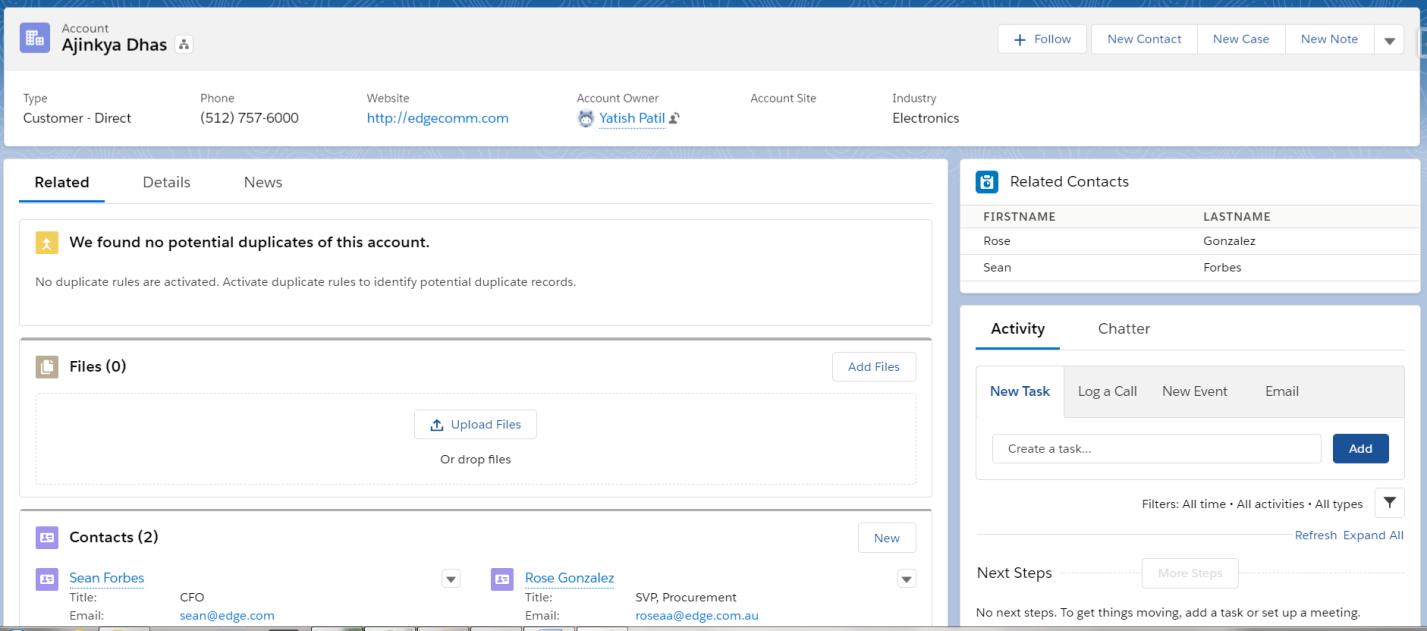
Let's add some design to it.
Let's add some design to it.
You can add any designs (CSS) of your choices. Explore the salesforce lightning design system (SLDS )library.
Let's have a look into it. Create a new account with no contacts in it or else open any existing account with no contacts.
Step 6 : Decorating our component.
--------------------------------------------------Cmp-------------------------------------------------------
<aura:component controller = "AjinkyaTestLightningAccController" implements="flexipage:availableForRecordHome,force:hasRecordId" access="global" >
<aura:attribute name="recordId" type="Id" />
<aura:attribute name="ContactList" type="Contact[]" />
<aura:handler name="init" value="{!this}" action="{!c.myAction}" />
<lightning:card iconName="standard:work_capacity_usage" title="Related Contacts">
<table class="slds-table slds-table_cell-buffer slds-table_bordered">
<thead>
<tr class="slds-line-height_reset">
<th class="slds-text-title_caps" scope="col">
<div class="slds-truncate" title="File Name">FirstName</div>
</th>
<th class="slds-text-title_caps" scope="col">
<div class="slds-truncate" title="File Name">LastName</div>
</th>
</tr>
</thead>
<tbody>
<aura:iteration items="{!v.ContactList}" var="con">
<tr class="slds-hint-parent">
<td data-label="File Name">
<div class="slds-truncate" title="File Name">{!con.FirstName}</div>
</td>
<td data-label="File Name">
<div class="slds-truncate" title="File Name">{!con.LastName}</div>
</td>
</tr>
</aura:iteration>
</tbody>
</table>
</lightning:card>
</aura:component>
--------------------------------------------------Cmp-------------------------------------------------------
This is Our Final Component After some designing, we have used an HTML table to store values.
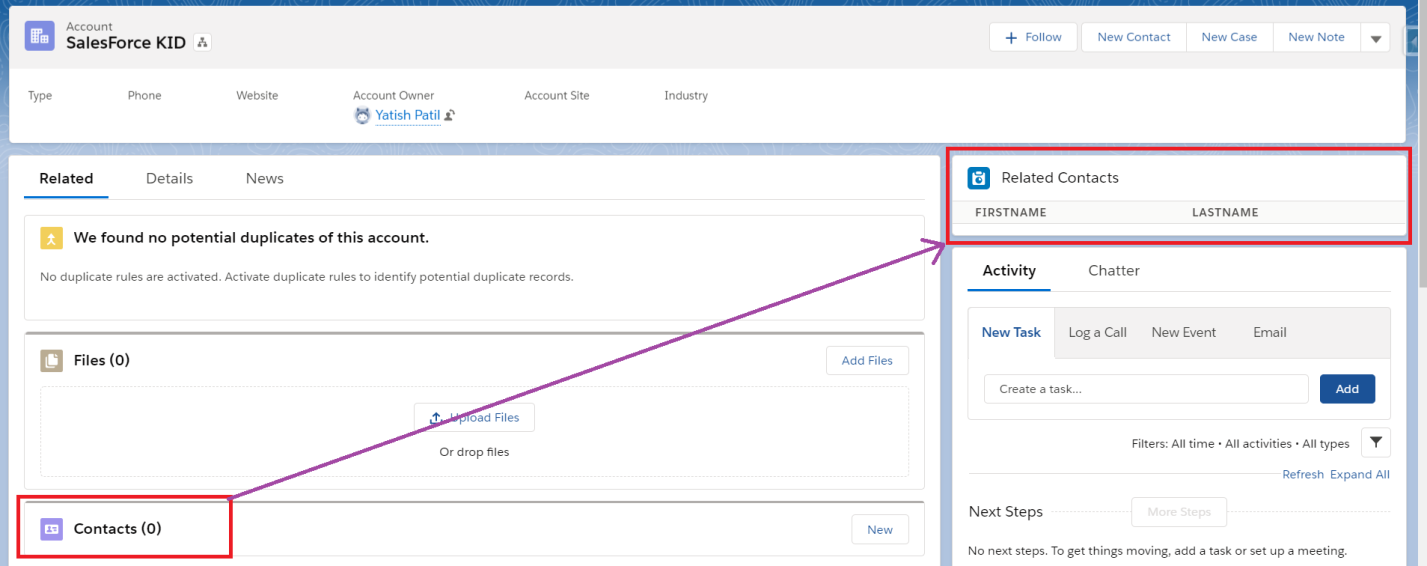
Step 7: Now we have a problem in the above component. Did you think of a
scenario where there are no contacts in account what will happen ?
scenario where there are no contacts in account what will happen ?
- Let’s handle this by adding Aura if-else. (You can refer EPISODE 9 if you are unaware of using it.)
- Let’s use our decorated component for this.
- We just need to add : <aura:if isTrue="Our Condition"> before our table starts.
After adding our condition, code will look something like this :
Output for above code (If there are no contacts):
And finish this with else condition after our table part ends.
(You can write any error message you want).
--------------------------------------------------Cmp-------------------------------------------------------
<aura:component controller = "AjinkyaTestLightningAccController" implements="flexipage:availableForRecordHome,force:hasRecordId" access="global" >
<aura:attribute name="recordId" type="Id" />
<aura:attribute name="ContactList" type="Contact[]" />
<aura:handler name="init" value="{!this}" action="{!c.myAction}" />
<lightning:card iconName="standard:work_capacity_usage" title="Related Contacts">
<aura:if isTrue="{!not(empty(v.ContactList))}">
<table class="slds-table slds-table_cell-buffer slds-table_bordered">
<thead>
<tr class="slds-line-height_reset">
<th class="slds-text-title_caps" scope="col">
<div class="slds-truncate" title="First Name">FirstName</div>
</th>
<th class="slds-text-title_caps" scope="col">
<div class="slds-truncate" title="last Name">LastName</div>
</th>
</tr>
</thead>
<tbody>
<aura:iteration items="{!v.ContactList}" var="con">
<tr class="slds-hint-parent">
<td data-label="File Name">
<div class="slds-truncate" title="File Name">{!con.FirstName}</div>
</td>
<td data-label="File Name">
<div class="slds-truncate" title="File Name">{!con.LastName}</div>
</td>
</tr>
</aura:iteration>
</tbody>
</table>
<aura:set attribute="else">
<div Style="text-align : center"> " There are no related contacts "</div>
</aura:set>
</aura:if>
</lightning:card>
</aura:component>
--------------------------------------------------Cmp-------------------------------------------------------

- We have handled the scenario where there are no related Contacts in Account.
- Let’s Take this Component to little advance level.
--------------------------------------------------------------------------------------------------------------------------------------------
Step 7: Inline Editing.
- Delete our previous table.
- Create a new attribute of list type to store the column values. (Column values are mandatory for lightning datatable, we will discuss it as we go ahead with component).
--------------------------------------------------Cmp-------------------------------------------------------
<aura:component controller = "AjinkyaTestLightningAccController" implements="flexipage:availableForRecordHome,force:hasRecordId" access="global" >
<aura:attribute name="recordId" type="Id" />
<aura:attribute name="ContactList" type="Contact[]"/>
<aura:attribute name="columns" type="List"/>
<aura:handler name="init" value="{!this}" action="{!c.myAction}" />
<lightning:card iconName="standard:work_capacity_usage" title="Related Contacts">
<aura:if isTrue="{!not(empty(v.ContactList))}">
<aura:set attribute="else">
<div Style="text-align : center"> " There are no related contacts " </div>
</aura:set>
</aura:if>
</lightning:card>
</aura:component>
--------------------------------------------------Cmp-------------------------------------------------------
- In the above code snippet we have removed our old table and just added a new attribute “columns” of type “list”.- Now add column values from our JS(which was created by us earlier).
--------------------------------------------------JS------------------------------------------------------
({
myAction : function(component, event, helper)
{
component.set('v.columns', [
{label: 'First Name', fieldName: 'FirstName', type: 'text' },
{label: 'Last Name', fieldName: 'LastName', type: 'text' }
]);
var ConList = component.get("c.getRelatedList");
ConList.setParams
({
recordId: component.get("v.recordId")
});
ConList.setCallback(this, function(data)
{
component.set("v.ContactList", data.getReturnValue());
});
$A.enqueueAction(ConList);
}
})
--------------------------------------------------JS------------------------------------------------------
- By adding these above 2 lines we will automatically store the column header of our fields with
its values in a list “column”.
its values in a list “column”.
Time to add datatable :
--------------------------------------------------Cmp-------------------------------------------------------
<aura:component controller = "AjinkyaTestLightningAccController" implements="flexipage:availableForRecordHome,force:hasRecordId" access="global" >
<aura:attribute name="recordId" type="Id" />
<aura:attribute name="ContactList" type="Contact[]"/>
<aura:attribute name="columns" type="List"/>
<aura:handler name="init" value="{!this}" action="{!c.myAction}" />
<lightning:card iconName="standard:work_capacity_usage" title="Related Contacts">
<aura:if isTrue="{!not(empty(v.ContactList))}">
<lightning:datatable data="{!v.ContactList }"
columns="{!v.columns }"
keyField="Id"
hideCheckboxColumn="true"/>
<aura:set attribute="else">
<div Style="text-align : center"> " There are no related contacts " </div>
</aura:set>
</aura:if>
</lightning:card>
</aura:component>
--------------------------------------------------Cmp-------------------------------------------------------
How about changing or editing random fields from the same page. Let’s do it.
Wait wait kid …..I am not done yet.
Firstly add a parameter to the 2 column fields we just added in JS: (“editable : true”)
Which will allow us to edit fields directly.
--------------------------------------------------JS------------------------------------------------------
({
myAction : function(component, event, helper)
{
component.set('v.columns', [
{label: 'First Name', fieldName: 'FirstName', type: 'text' , editable: true},
{label: 'Last Name', fieldName: 'LastName', type: 'text' , editable: true}
]);
var ConList = component.get("c.getRelatedList");
ConList.setParams
({
recordId: component.get("v.recordId")
});
ConList.setCallback(this, function(data)
{
component.set("v.ContactList", data.getReturnValue());
});
$A.enqueueAction(ConList);
}
})
--------------------------------------------------JS------------------------------------------------------
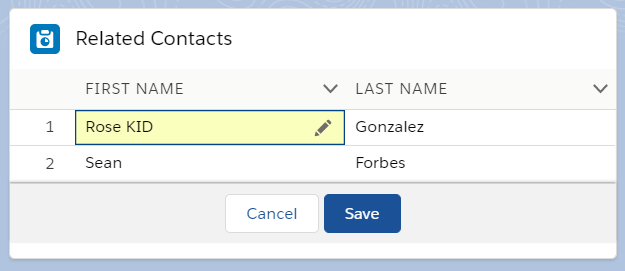
A pencil symbol will appear by hovering our mouse and you will be able to edit any field by clicking
on that pencil icon/symbol.


Wait wait kid …..I am not done yet.
We can just change in the values in UI (Box) but we now need to update these values from our controller so that changes can be saved directly on the same page. Correct ?
- Quickly Create a new attribute in our component to add updated values.
- Now we have to create a method in apex from where we can update the contact.
- After creating the above method lets update our Component First then we can make some small changes in JS:
- Now it's time to modify our JS controller of Component.
The last thing we have to do is in ou datatable call this new function (“SaveUpdatedContacts”) using parameter “onsave”.
Finally, we created our first Advanced Lightning Component.
- Open any account page which has related contacts.
<aura:attribute name="UpdatedList" type="Contact[]"/>
Add this method snippet in our existing Apex controller:-
--------------------------------------------------Apex Class------------------------------------------------------
public with sharing class AjinkyaTestLightningAccController
{
@AuraEnabled
public static list<Contact> getRelatedList(Id recordId)
{
List<Contact> Conlist = [Select id,firstname,lastname from Contact where AccountId =: recordId ];
return Conlist;
}
@AuraEnabled
public static void updateRelatedList(List<Contact> Conlist)
{
if(Conlist!= null && Conlist.size()>0)
{
update Conlist;
}
}
}
--------------------------------------------------Apex Class------------------------------------------------------
- Draftvalues is a parameter in the datatable from where we can get updated values from our component
directly.
- Assign the attribute “UpdatedList” to “draftValues” parameter. As shown below.
--------------------------------------------------Cmp-------------------------------------------------------
<aura:component controller = "AjinkyaTestLightningAccController" implements="flexipage:availableForRecordHome,force:hasRecordId" access="global" >
<aura:attribute name="recordId" type="Id" />
<aura:attribute name="ContactList" type="Contact[]"/>
<aura:attribute name="columns" type="List"/>
<aura:attribute name="UpdatedList" type="Contact[]"/>
<aura:handler name="init" value="{!this}" action="{!c.myAction}" />
<lightning:card iconName="standard:work_capacity_usage" title="Related Contacts">
<aura:if isTrue="{!not(empty(v.ContactList))}">
<lightning:datatable data="{!v.ContactList }"
columns="{!v.columns }"
keyField="Id"
draftValues= "{!v.UpdatedList}"
hideCheckboxColumn="true"/>
<aura:set attribute="else">
<div Style="text-align : center"> " There are no related contacts " </div>
</aura:set>
</aura:if>
</lightning:card>
</aura:component>
--------------------------------------------------Cmp-------------------------------------------------------
- Create a new Function. (In our example we are using the function name as “SaveUpdatedContacts”)
- Create a variable to store the draftValues(Updated values). ==( UpdatedList)
- After that create another variable to call the apex class method. == (UpdateContacts)
- We have parameter for this method (UpdateContacts) which in that method which will take
our updated values. So set the parameter == (Conlist : UpdatedList)
And in callback recall the previous method again so that values will get refreshred :
(“$A.enqueueAction(component.get('c.myAction'))”).
- This time in callback we are using response parameter. “.setCallback(this,
function(response)” so that we can recognize if the status is SUCCESS or Error and can
handle the errors while updating values.
Below is the updated snippet of JS.
--------------------------------------------------JS------------------------------------------------------
({
myAction : function(component, event, helper)
{
component.set('v.columns', [
{label: 'First Name', fieldName: 'FirstName', type: 'text' , editable: true},
{label: 'Last Name', fieldName: 'LastName', type: 'text' , editable: true}
]);
var ConList = component.get("c.getRelatedList");
ConList.setParams
({
recordId: component.get("v.recordId")
});
ConList.setCallback(this, function(data)
{
component.set("v.ContactList", data.getReturnValue());
});
$A.enqueueAction(ConList);
},
SaveUpdatedContacts : function(component,event,helper)
{
var UpdatedList = event.getParam('draftValues');
var UpdateContacts = component.get("c.updateRelatedList");
UpdateContacts.setParams
({
Conlist : UpdatedList
});
UpdateContacts.setCallback(this, function(response)
{
var state = response.getState();
if (state === 'SUCCESS')
{
$A.enqueueAction(component.get('c.myAction'));
$A.get('e.force:refreshView').fire();
}
else{
//error handling
}
});
$A.enqueueAction(UpdateContacts);
}
})
--------------------------------------------------JS------------------------------------------------------
--------------------------------------------------Cmp-------------------------------------------------------
<aura:component controller = "AjinkyaTestLightningAccController" implements="flexipage:availableForRecordHome,force:hasRecordId" access="global" >
<aura:attribute name="recordId" type="Id" />
<aura:attribute name="ContactList" type="Contact[]"/>
<aura:attribute name="columns" type="List"/>
<aura:attribute name="UpdatedList" type="Contact[]"/>
<aura:handler name="init" value="{!this}" action="{!c.myAction}" />
<lightning:card iconName="standard:work_capacity_usage" title="Related Contacts">
<aura:if isTrue="{!not(empty(v.ContactList))}">
<lightning:datatable data="{!v.ContactList }"
columns="{!v.columns }"
keyField="Id"
draftValues= "{!v.UpdatedList}"
onsave="{!c.SaveUpdatedContacts}"
hideCheckboxColumn="true"/>
<aura:set attribute="else">
<div Style="text-align : center"> " There are no related contacts " </div>
</aura:set>
</aura:if>
</lightning:card>
</aura:component>
--------------------------------------------------Cmp-------------------------------------------------------
Step 8: Final Output and testing
- Click on pencil button of any field you want to edit.

- Press “Enter” key on the keyboard. (Automatically Save and cancel button will appear).
- You can press “Cancel” and changes will be reverted. And you want the changes to be saved then click on “Save”.
After you click on Save Automatically page will get refreshed and you will get the final values:


SPECIAL THANKS TO YATISH PATIL FOR THIS BLOG CONTRIBUTION
WOHOOO !! YOU HAVE JUST CREATED ADVANCED LIGHTNING COMPONENT
If you like this salesforcekid learning platform please let me know in the Comment section...Also, Share with your salesforce folks wish you
Happy learning ☁️⚡️ (Learn. Help. Share.)

Lightning Component To Display Contacts Related To Particular Account | Salesforce Lightning
 Reviewed by
on
Rating:
Reviewed by
on
Rating:
Reviewed by
on
Rating:


Thanks Yatish Patil, this step by step explanation is awesome. Love to see more like this. Again Thank you so much.
ReplyDeleteReally appreciated. The whole working code is here. Thanks a lot.
ReplyDeleteThanks for your valuable time Karan ! we are glad that you liked it 😊
DeleteHappy Learning, #salesforceKid ☁️⚡️
I need your help
ReplyDeleteDisplay account in data table and If the user selects any account record than display regarding contacts in another data table (Using LWC)
Hi SHAIK,
DeleteSure We will help you to achieve that, It would be great if you post this question in ASK section. We will work on that.
Happy Learning #salesforceKid
Hello Ajinkya,
DeleteDid you post the solution for above query,I am also looking for same thing.I would really appreciate ,if you will help us.Thanks
Sure!! I will post this soon.
DeleteIn the same component I want to add delete button for every contact when I want to delete that contact I have to use that button.Please help me
DeleteHello Bhargavi,
DeleteThanks for reaching out!
As per your requirement, you can add delete button when iterating the records.
Now, Inside markup cmp you need to write something like this :
========
========
and now the important part here is getting id of that particular record which you would like to delete inside your .JS file.
========
handleClick : function(component, event, helper) {
var targetId = event.target.id;
alert(targetId); // You will get your Id here
});
========
Now once you get the Id you can make a server call or you can maintain the list of record to delete to delete multiple records at a time.
Please let me know in case if you face any issues.
Happy Learning!! ☁️⚡️
Hi,
ReplyDeleteThe way of explanation is very Nice, it was very useful for me, Thank You
Thanks for your time, Happy Learning
DeleteRegards,
SalesforceKid Team
Hi, I used your example to display contacts related to an opportunity using opportunitycontactroles. It displays the contact fields very well and I'm able to edit them in the datatable. (name, mailing address, etc.) but I also want to add two fields from the opportunitycontactrole record to the datatable as well. I'm having difficulty with them not being displayed. Even when I flatten the data. Any suggestion for how to include those as columns in the datatable as well?
ReplyDeleteCan you share your server side controller snippet it will help me to understand your issue ?
DeleteI believe this is the way to do it, but my ShipMethod column is still displaying empty?
ReplyDeletevar ConList = component.get("c.getRelatedList");
ConList.setParams
({
recordId: component.get("v.recordId")
});
ConList.setCallback(this, function(data)
{
//component.set("v.ContactList", data.getReturnValue());
var rows = data.getReturnValue();
var ShipMethod = [];
rows.forEach(contact => {
if (contact.OpportunityContactRoles && contact.OpportunityContactRoles.length > 0){
contact.OpportunityContactRoles.forEach(ocr => {
ShipMethod.push(ocr.Ship_Method__c);
});
contact['OpportunityContactRoles'] = ShipMethod.join(' - ');
}
});
component.set('v.ContactList', rows);
});
$A.enqueueAction(ConList);
},
Hi,
DeletePlease check :
- If those fields are there in your Apex Class SOQL Query
- If it is present then when you are iterating the list in your .cmp or markup there you need to create two more column for these two extra fields. Then iterate them with ListInstance.FieldName.
Please try this and let me know.....if it helps
Happy Learning ⚡️☁️
Thanks! Yes, they are in the apex controller query and I can see them returned correctly in the debug log. Since the fields are from child records, not lookup/related records will the ListInstance.FieldName work?
DeleteThen query on child record and call parent field from child like for example
DeleteList ch = [Select, Id, Name, Parent__r.Name, Parent__r.Field2......etc From Child__c];
Then this list will give you both the both child as well as parent record.
Please let me know in case of any queries.
HAPPY LEARNING....😊
Best Regards,
AJINKYA DHAS,
can you please help for how to get related data of custom object???
ReplyDeleteSure, As this is related to your Server side controller (Apex) Please visit our SOQL Episodes under the apex section or open the below link to redirect :
DeleteLINK :
https://www.salesforcekid.com/2019/05/salesforce-soql-relationship-queries.html
HAPPY LEARNING ⚡️
Best Regards,
AJINKYA DHAS
In input we pass a email, if multiple email exists with the same email show that list in new tab when click on button.please help me
ReplyDeletePlease share your personal queries in ASK Section of this blog.
DeleteThanks, Happy Learning ! 😊
Great post but is there anyway to control the design of the datatable such as the position of the inline edit for a particular field (align left rather than right)? Also, I added a picklist field but am not seeing the values display eventhough the values are available for the recordtype.
ReplyDeleteThen You need to go with HTML Table, where you can customise the design and alignment as per your requirement with custom CSS.
DeleteI hope this will help Thanks ��
Excellent, thanks for the reply! I also had a question if you had a tutorial on how to write test classes for lightning components or do you specifically have test code for the exercise above. This would be most helpful.
DeletePlease visit our APEX Section to learn how to write test classes from the Menu .
DeleteI am glad to know that its helping you 😊
⚡️HAPPY LEARNING ⚡️
Hi,
ReplyDeleteMy requirement is to show account in col 1 and its related contacts in col 2 row by row.
I am trying to achieve this using wrapper class.
Please let me know how to display it on my aura component as below is m code.
component
-----------------------------
-------- {!v.accConList[0].accRec[0].Name}
lets see !!!!
{!accCon.accRec[0].name}
---------------------
controller.js
-----------------------------------------------------
({
doInit : function(component, event, helper) {
//alert('inside do init');
var action=component.get('c.fetchAccountContact');
action.setCallback(this,function(response){
var state=response.getState();
if(state=='SUCCESS' || state=='DRAFT'){
var returnValue=response.getReturnValue();
console.log('data returned---'+returnValue);
console.log('data returned---'+JSON.stringify(returnValue));
alert('reurt value---'+JSON.stringify(returnValue));
component.set('v.accConList',response.getReturnValue());
}
});
$A.enqueueAction(action);
}
})
--------------------------------
apex controller
-----------------------------------------
public class AccountContact{
public static list accList=new list();
public static List accConList{get; set;}
@AuraEnabled
public static List fetchAccountContact()
{
accList=[Select Id,Name,Phone,(select id,lastname from contacts) from Account];
for(integer i=0;i();
accConList.add(new AccConWrap(accList[i],accList[i].Contacts));
}
return accConList;
}
public class AccConWrap{
public Account accRec{get;set;}
public List conRecList{get;set;}
public AccConWrap(Account acc,List con){
accRec=acc;
conRecList=con;
}
}
}
------------------------------------------------
Hi,
DeletePlease find the wrapper class Episode link to understand more :
https://www.sfdckid.com//2020/01/wrapper-class-in-salesforce-lightning.html
I hope this will help you.
⚡️HAPPY LEARNING ⚡️
Unable to see the pictures.
ReplyDeleteThanks for informing 😊. I have updated the pictures and Now its available. Apologies for trouble 🙏🏻
Delete⚡️HAPPY LEARNING ⚡️
Thank you, it helped me a lot
ReplyDeleteThanks Ajinkya, this is helpful. Is there a way where Contact Lookup in Opportunity should only display Contacts that are related to a particular Account? This is filter for End User Contact field in Opportunity "End User Contact: Account Name ID EQUALS Opportunity: Account Name ID". Not sure why it display empty on End User Contact field after create new opportunity. Any thoughts?
ReplyDeleteThanx Ajinkya! Great Work! My first comment on blog in 10 years, Hoping to see more.
ReplyDeleteKeep it up Ajinkya!!
ReplyDeleteNeed to make a button named "Evaluate" on Accounts object. On clicking this button a modal should open which will show a list of accounts in tabular format. Also, a button labeled as "Next" to be present on modal which will open new modal window containing related contacts in tabular format when clicked. On second modal i.e. related contacts), a button labeled as "Next" to be present on modal which will open a new modal window containing related opportunities in tabular format when clicked and another button labeled as "Back" to be present on modal which will get to previous modal.
ReplyDeleteCan anyone help me with this
Hi can you share the code for getting contacts while selecting accounts by using checkbox in aura events
ReplyDeleteplease provide the same above code in lwc
ReplyDeleteIs there a way to add the hyperlink functionality to the first column which will allow users to click on a contact record and be automatically taken there?
ReplyDelete